
Sensor: Kubernetes and K3s
Telovix deploys one Sensor pod on each selected Linux node through a Helm-managed DaemonSet. Use this path for Kubernetes, K3s, and containerized telecom platforms.
Prerequisites
- Kubernetes 1.24 or newer
- Helm 3.14 or newer
- Cluster-admin or equivalent installation permission
- Console Operator or Admin access to generate the cluster enrollment token
- Linux nodes with kernel 5.4 or newer and BTF
- Permission to run the Sensor as privileged with required host access
- Outbound Console connectivity from every selected node
- Sufficient allocatable CPU and memory for the chart defaults
See Requirements before installing on production or real-time nodes.
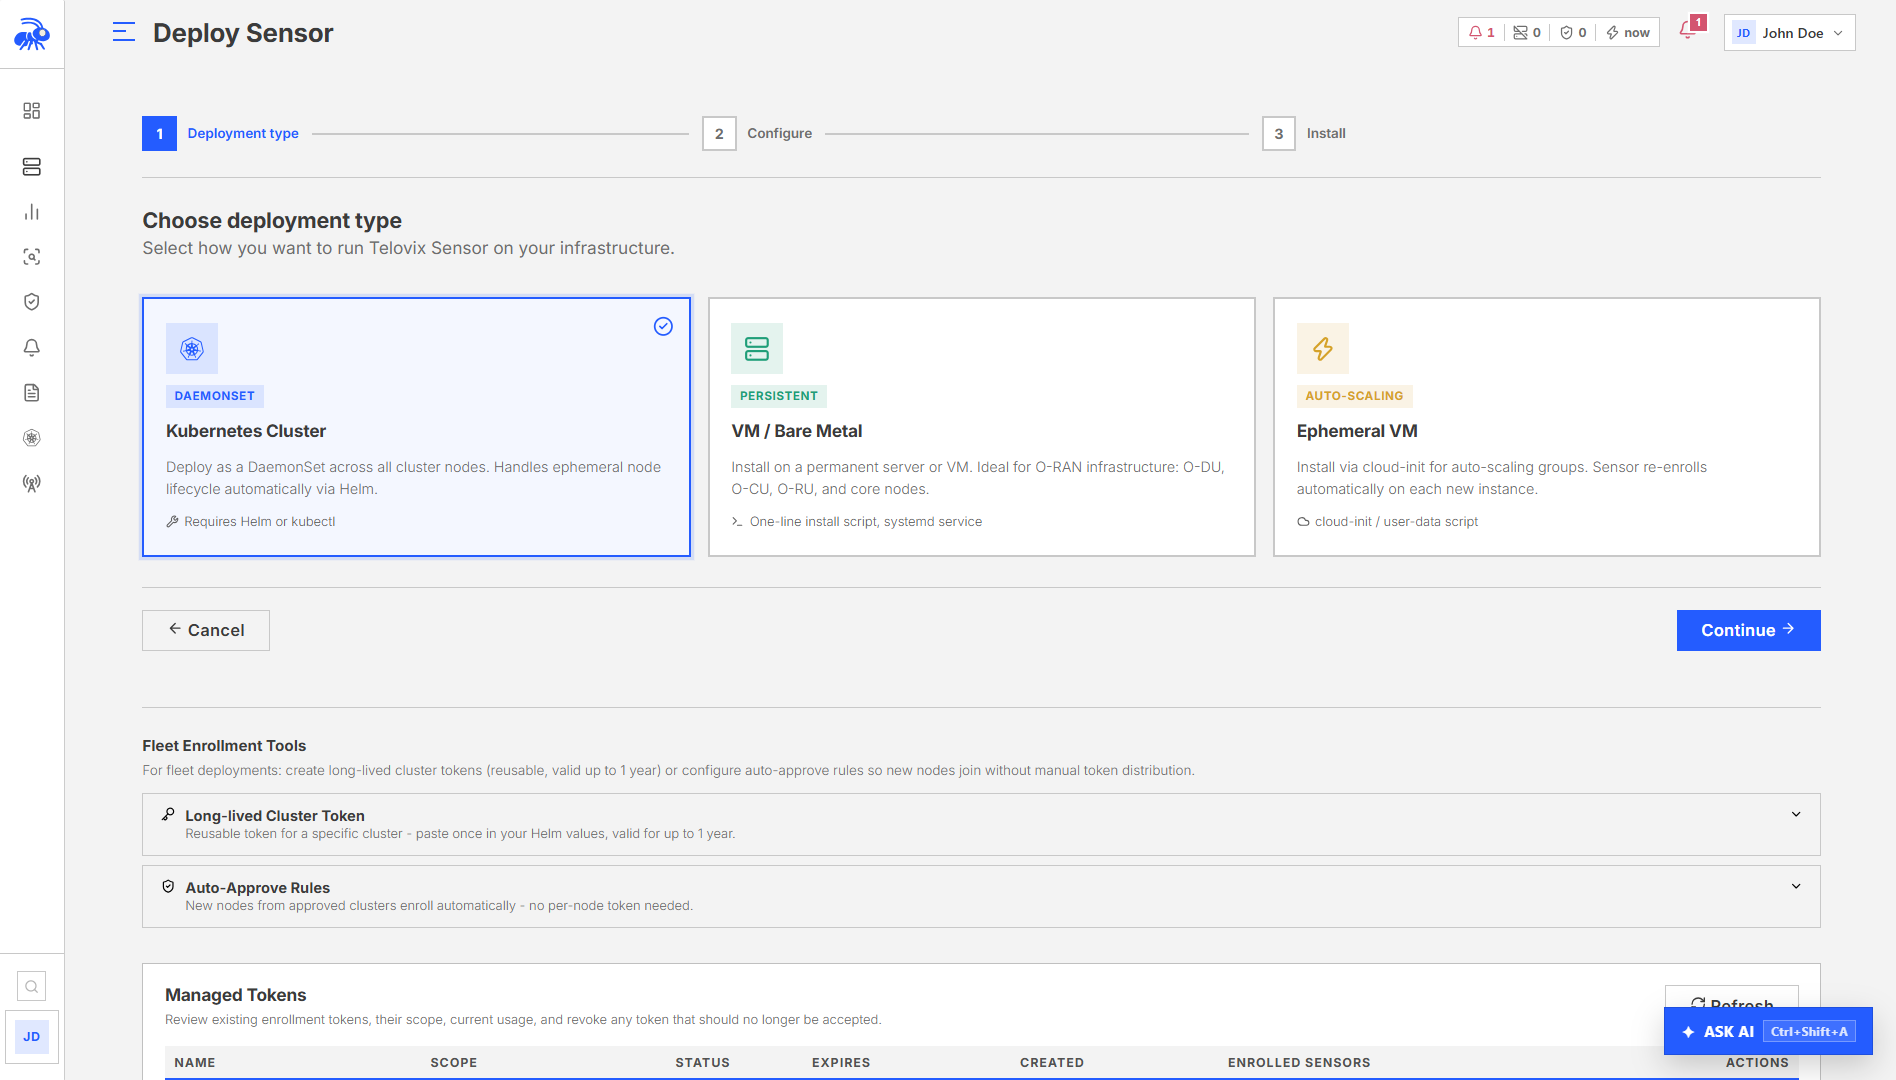
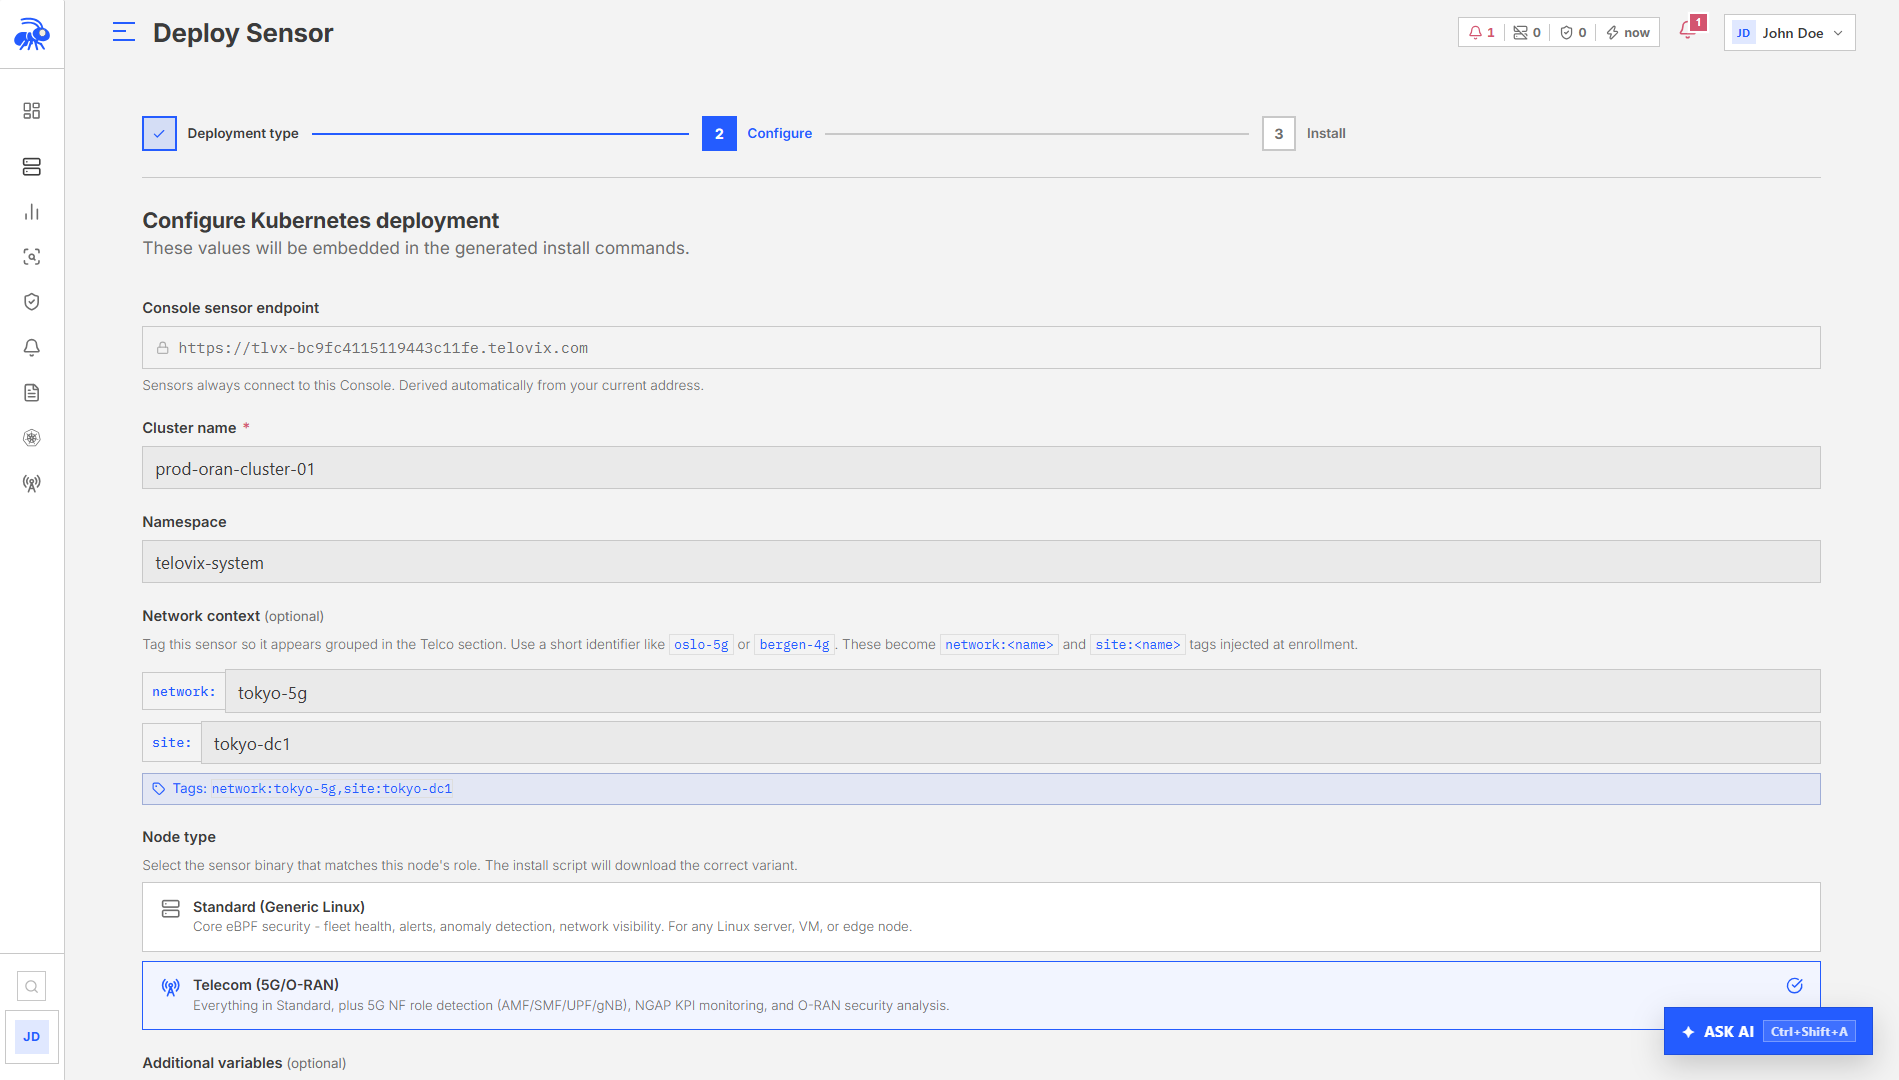
Deploy from the Console
- Open Sensors > Deploy.
- Select Kubernetes.
- Enter a stable, unique cluster name.
- Choose the namespace, normally
telovix-system. - Select Standard or Telecom.
- Add cluster, site, environment, or network tags.
- Generate the deployment instructions.
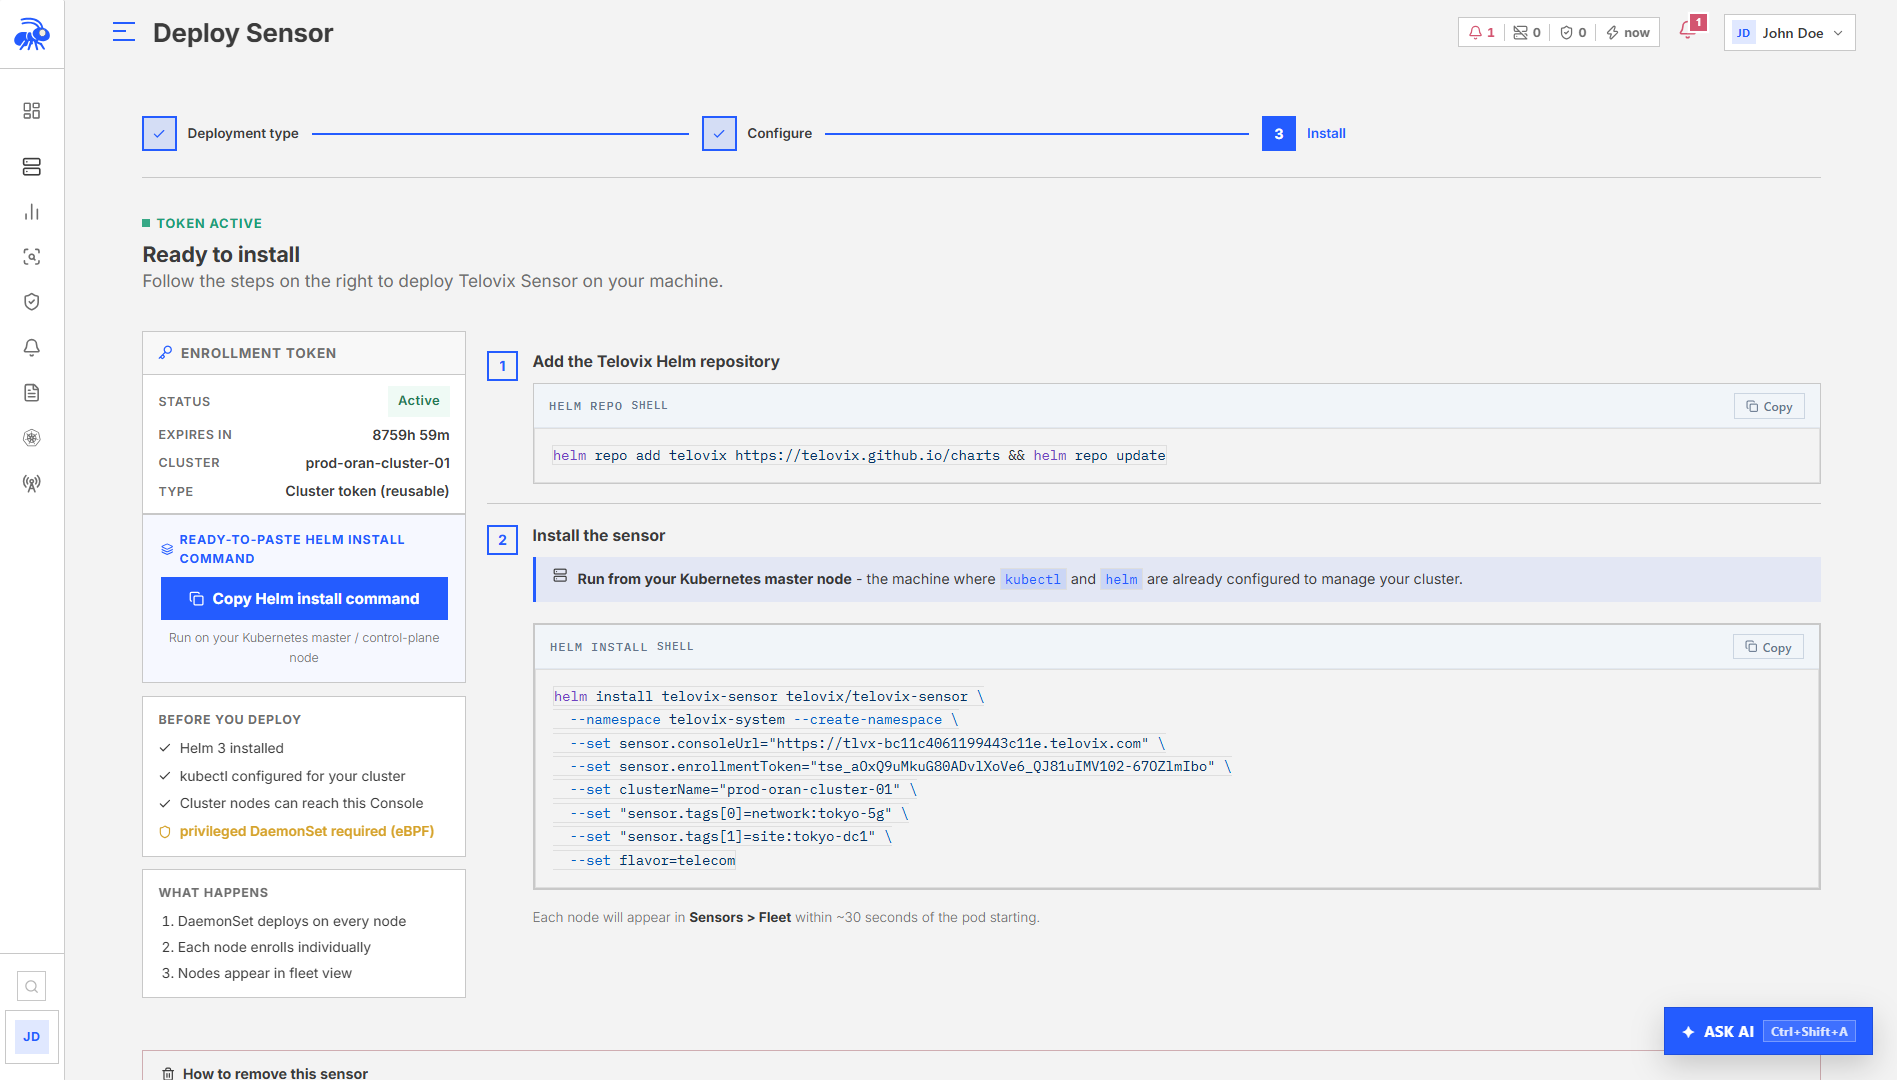
- Run the generated commands from a workstation or control-plane node with access to the cluster.
The wizard creates a reusable cluster credential and generates the correct Helm values for the selected Console, cluster name, flavor, and namespace.
Manual Helm pattern
Use the command generated by the Console whenever possible. A typical Secret-backed installation follows this pattern:
kubectl create namespace telovix-system
kubectl create secret generic telovix-sensor-token \
  --namespace telovix-system \
  --from-literal=enrollmentToken='<cluster-token>'

helm repo add telovix https://telovix.github.io/charts
helm repo update telovix

helm upgrade --install telovix-sensor telovix/telovix-sensor \
  --namespace telovix-system \
  --set sensor.consoleUrl='https://<console-host>:15483' \
  --set sensor.existingSecret='telovix-sensor-token' \
  --set clusterName='production-cluster' \
  --set flavor='standard'
Use flavor=telecom for 5G and O-RAN nodes. The chart selects the matching image variant automatically.
For repeated production deployments, store non-secret overrides in a reviewed values file and keep the enrollment token in a Secret.
What the chart creates
- Sensor DaemonSet
- ServiceAccount and cluster-scoped read permissions for workload attribution
- Enrollment Secret or reference to an existing Secret
- Configuration objects
- Host mounts and privileged security context required for runtime visibility
- Rolling update policy
The default resource settings are 50m CPU and 128 MiB memory requested, with limits of 500m CPU and 2 GiB memory. Use values-oran-vdu.yaml only after validating its constrained profile on the target RAN node.
Limit deployment scope
By default, the DaemonSet targets eligible Linux nodes. Use chart-supported node selectors, affinity, and tolerations to limit deployment to approved nodes.
Common rollout patterns include:
- one canary worker before the full cluster;
- a dedicated telecom node pool using the Telecom flavor;
- exclusion of isolated L1 CPU nodes until resource validation is complete;
- separate releases when Standard and Telecom nodes require different scheduling rules.
Verify rollout
kubectl -n telovix-system rollout status daemonset/telovix-sensor
kubectl -n telovix-system get pods -o wide
kubectl -n telovix-system logs daemonset/telovix-sensor --tail=100
Then verify in the Console:
- the cluster appears once with the selected name;
- expected nodes appear in Sensors > Fleet;
- Kubernetes namespaces, workloads, pods, and images populate;
- cluster-scoped API Security and network views receive current data;
- Sensor versions and flavors match the Helm release.
Upgrade
Open Sensors > Fleet > Upgrade Fleet > Kubernetes. Use Manage updates when the fleet is already current.
Choose Helm for a manual update, Managed rollout for Console-controlled updates after setup, or Flux / Argo CD for a GitOps-owned release. See Upgrading Sensors for the complete workflow and current command.
Use the Console-generated command rather than changing only image.tag: an existing image digest can keep a pod on the previous release. Verify both the DaemonSet rollout and each sensor's reported version.
Uninstall
For Flux or Argo CD, retire the sensor deployment through its owning GitOps configuration and controller. Follow your team's deletion procedure and verify the workloads are removed. A manual Helm uninstall can be undone by reconciliation; an Argo CD-managed installation may not have a Helm release to uninstall.
For a Helm-managed release without GitOps, run Helm from a workstation or control-plane node that can access the cluster:
helm uninstall telovix-sensor --namespace telovix-systemThe Sensor detail page also shows the release name, namespace, and deployment-aware uninstall guidance. A normal pod replacement or upgrade keeps the sensor's Console identity; remove its Console record only when intentionally retiring the deployment. Delete the enrollment Secret only when it is no longer needed by any Sensor in that cluster.
Troubleshooting
| Symptom | Check |
|---|---|
| Pod is Pending | Node selectors, taints, resources, architecture, and admission policy. |
| Init or Sensor container fails | Privileged access, BTF, BPF filesystem, host mounts, and Console reachability. |
| Nodes appear under the wrong cluster | Confirm clusterName matches the credential and Helm values. |
| Workload metadata is absent | Confirm the chart RBAC objects exist and the ServiceAccount is used. |
| Only some nodes appear | Compare DaemonSet desired/current counts and scheduling constraints. |
| Upgrade command reports a missing nested value | Update the chart and use --reset-then-reuse-values once for the legacy release. |
| Pods update but Console shows an old version | Wait for new heartbeats, then check pod image tags and Sensor logs. |