Appearance
Upgrading Sensors
Sensor upgrades are delivered through the Console upgrade plan system. The Console signals individual sensors at heartbeat time, the sensor downloads the new binary from the Console, verifies the SHA-256 digest, replaces its binary, and restarts the service. Kubernetes sensors receive a Helm image version signal instead and require a helm upgrade by the operator.
Prerequisites
- Existing Telovix self-hosted deployment with at least one enrolled sensor
adminrole on the Console (required to upload binaries and create upgrade plans)- Current sensor version known for each fleet member (visible in Sensors)
- Console data backed up before proceeding (database file or backup snapshot depending on storage configuration)
- New sensor binary downloaded from the Portal Downloads page and checksum verified
Before you start
- Stage the new sensor binary on the Console before creating any upgrade plan (see Stage sensor binaries).
- Plan creation fails immediately with a
binary_not_stagederror if no binary is available for eitheramd64orarm64. - Review fleet health before creating a plan. Do not start an upgrade on sensors that are already stale, degraded, or have a heartbeat backlog.
- Separate version changes from policy changes and enforcement changes. Do not combine a sensor upgrade with a pack assignment change or an enforcement activation in the same window.
Stage sensor binaries
Download the new sensor binaries from the Portal Downloads page and stage them on the Console. The Console serves these binaries to sensors during upgrade.
Via the Console UI
Navigate to Settings > Sensor Binaries and click Upload Binary. Select the architecture, flavor, and binary file. Repeat for each architecture and flavor you support.
If the upload fails with a size error, the most common cause is the binary exceeding the 200 MB per-file limit; verify you downloaded the correct architecture-specific binary and not an unintended combined archive.
Automation and API access
Sensor binary staging is handled through the Console UI under Settings > Sensor Binaries.
The upload limit per binary is 200 MB. The Console stores the SHA-256 digest of each uploaded binary and includes it in the upgrade signal so sensors can verify the download before replacing their running binary.
Upgrade strategies
Three strategies are available when creating an upgrade plan:
rolling (default)
Upgrades sensors in sequential waves of 25% of the target scope. After each wave completes, the Console waits health_check_wait_secs (default: 300 seconds) before starting the next wave. If any sensor in a completed wave goes offline within the health check window, the plan auto-pauses and an operator must resume it manually.
This is the recommended strategy for production fleets.
canary
Upgrades a configurable percentage of sensors first (default: 10%, configurable via canary_pct). The remaining sensors do not receive the upgrade signal until an operator explicitly approves the canary batch from Sensors > Upgrade Plans > [plan] > Approve Canary. There is no timeout on canary approval; the plan waits indefinitely.
Use this strategy for high-risk upgrades or when you want a manual gate before fleet-wide rollout. Approve the canary from Sensors > Upgrade Plans > [plan].
immediate
Signals all sensors in scope simultaneously at their next heartbeat. No wave control, no health check wait, no auto-pause. Use only for small, controlled scopes such as a single sensor group or a handful of specific sensor IDs.
Plan scope
An upgrade plan applies to one of three scopes:
| Scope | How to set it |
|---|---|
| All sensors (default) | Leave the scope at the fleet-wide default |
| Specific sensors | Select the specific sensor IDs you want to upgrade |
| Sensor group | Select the target sensor group |
Creating an upgrade plan
From the Console UI
Go to Sensors and click Upgrade Plan. Select the target version, strategy, and scope. The Console shows a fleet breakdown (how many sensors are on the current version vs the target version) before you confirm.
If Upgrade Plan is missing or greyed out, the most common cause is the logged-in account not having admin role; only admins can create upgrade plans.
Automation and API access
Upgrade plan creation is handled through the Console UI. The upgrade workflow is not available via the external API.
Create upgrade plans from Sensors > Upgrade Plan in the Console UI. If plan creation fails with binary_not_staged, the most common cause is the binary not having been uploaded for one or both supported architectures; complete the staging step before creating a plan.
When creating a plan, configure these fields:
| Field | Required | Default | Description |
|---|---|---|---|
target_version | Yes | Target binary version string | |
strategy | No | rolling | rolling, canary, or immediate |
canary_pct | No | 10 | Percentage of sensors in the canary batch (canary strategy only) |
health_check_wait_secs | No | 300 | Seconds to wait between rolling waves or after canary |
sensor_ids | No | (all sensors) | List of specific sensor IDs to upgrade |
group_id | No | (all sensors) | Sensor group ID to upgrade |
How sensors receive the upgrade signal
The Telovix Console includes the upgrade directive in the heartbeat response for each sensor that is scheduled to receive an upgrade. The sensor checks the following fields in the response:
| Field | Description |
|---|---|
upgrade_plan.target_version | Version string of the new binary |
upgrade_plan.sha256 | SHA-256 hex digest; the sensor verifies this before replacing its binary |
upgrade_plan.apply_after | RFC3339 timestamp; if set, the sensor waits until this time before applying |
available_version | Simple version string used when no plan is active (fallback signal) |
update_binary_sha256 | SHA-256 for the fallback signal path |
helm_upgrade_required | Set for Kubernetes-managed sensors; value is the target version |
The sensor downloads the binary from the Console sensor download endpoint, verifies the SHA-256 digest against the value in the heartbeat response, replaces /usr/local/bin/telovix-sensor, and restarts itself. The Console records the sensor as upgraded once it sends a heartbeat at the new version.
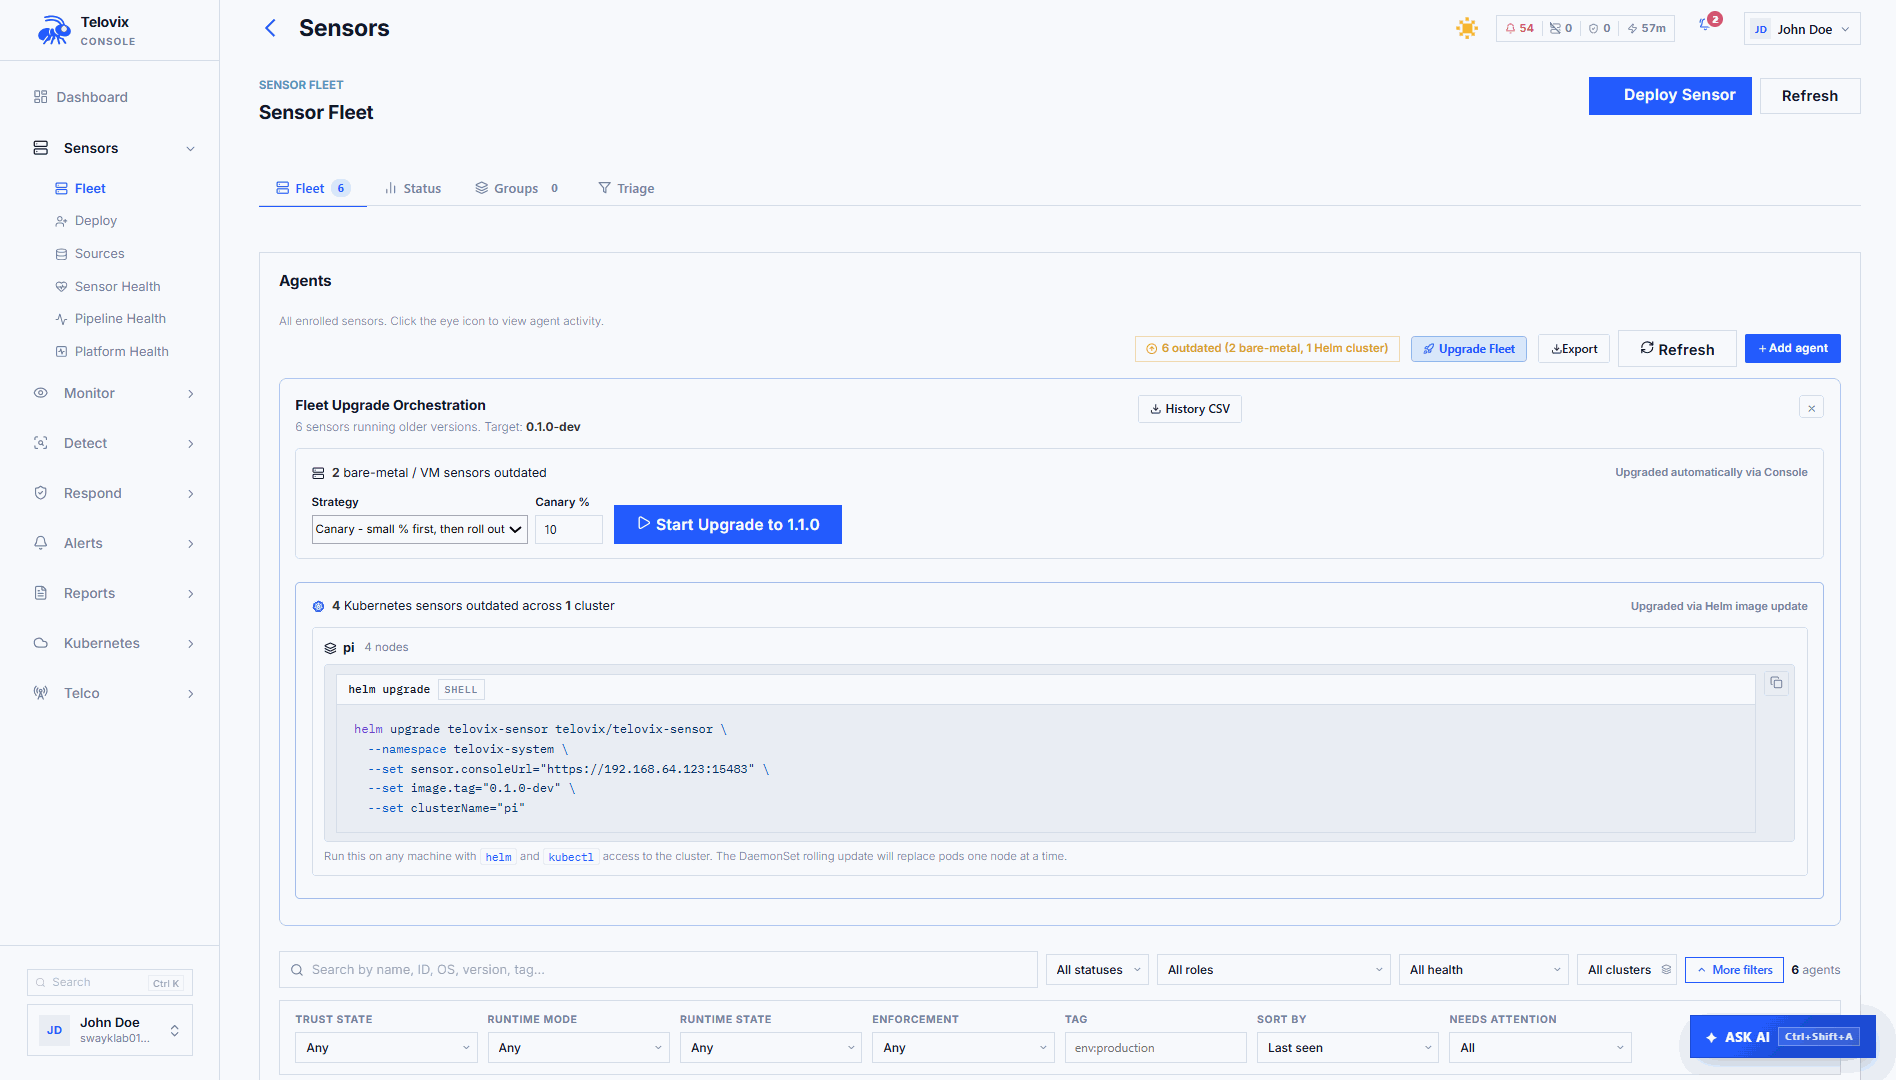
Kubernetes sensors
Kubernetes sensors receive helm_upgrade_required in the heartbeat response instead of a binary upgrade directive. The sensor does not self-update in Kubernetes. The Console is signaling that a new image is available and an operator must apply it:
bash
helm upgrade telovix-sensor telovix/telovix-sensor \
  --namespace telovix-system \
  --reuse-values \
  --set image.tag=1.3.0
If this command fails with release not found, the most common cause is the release being in a different namespace; run helm list -A to find the correct namespace and add --namespace <correct-namespace> to the command.
Expected output:
Release "telovix-sensor" has been upgraded. Happy Helming!
NAME: telovix-sensor
LAST DEPLOYED: Thu Apr 26 14:22:01 2026
NAMESPACE: telovix-system
STATUS: deployed
REVISION: 2
Watch the rollout progress:
bash
kubectl rollout status daemonset/telovix-sensor -n telovix-systemExpected output when complete:
daemon set "telovix-sensor" successfully rolled outAfter the Helm upgrade, the DaemonSet rolls out one pod at a time (default maxUnavailable: 1). Each pod runs the init container credential check, then starts the main sensor container. The sensor reconnects and sends a heartbeat at the new version.
Plan status lifecycle
| Status | Meaning |
|---|---|
pending | Plan created, waiting for the next sensor heartbeat cycles to start distributing the upgrade |
in_progress | At least one sensor has been signaled; upgrade is actively rolling out |
paused | Plan was paused by an operator or auto-paused by the health check loop |
complete | All sensors in scope have confirmed the new version |
rolled_back | Plan was manually rolled back |
Plans move to complete automatically once all in-scope sensors have heartbeated at the target version and the health_check_wait_secs window has passed since the last sensor upgrade.
Pausing an upgrade
In the Console, navigate to Sensors > Upgrade Plans, click the plan, and click Pause Plan. The plan moves to paused status and stops signaling sensors.
The Console also auto-pauses rolling and canary plans when any upgraded sensor goes offline within the health check window. The paused reason is shown on the plan detail page: Auto-paused: one or more recently upgraded sensors went offline. Check sensor health before resuming.
Approving a canary
In the Console, navigate to Sensors > Upgrade Plans, click the canary plan, review the health of the canary batch, and click Approve Canary. This signals the remaining sensors at their next heartbeat. The approval button is only available when the plan is in_progress with strategy=canary and has not yet been approved.
Rolling back
In the Console, navigate to Sensors > Upgrade Plans, click the plan, and click Mark as Rolled Back. This changes the plan's status to rolled_back in the Console. It does not automatically downgrade sensors that have already received the new binary. The sensor binary on each host is not reverted by the rollback.
To revert already-upgraded sensors, stage the previous binary and create a new upgrade plan targeting the old version:
- Upload the previous binary via Settings > Sensor Binaries.
- In Sensors > Upgrade Plans, click Create Plan, set the target version to the previous version, and choose
immediatestrategy.
Manual binary update (without upgrade plans)
For a single node or in environments where the upgrade plan workflow is not appropriate, update the binary manually:
bash
# On the target sensor host
sudo systemctl stop telovix-sensor
sudo install -m 0755 ./telovix-sensor /usr/local/bin/telovix-sensor
sudo systemctl start telovix-sensor
sudo journalctl -u telovix-sensor -n 50 --no-pager
If systemctl start fails after the binary replacement, the most common cause is the new binary being the wrong architecture for this host; verify the binary matches the host CPU with file /usr/local/bin/telovix-sensor before restarting.
Expected output after restart:
[telovix] starting sensor version=1.3.0
[telovix] enrolled successfully, sensor_id=tlvs_...
[telovix] heartbeat sent version=1.3.0
Verify the version is updated in the Console:
bash
# Confirm the version reported in the heartbeat
journalctl -u telovix-sensor --no-pager | grep "version="
Expected output:
[telovix] heartbeat sent version=1.3.0After restart, the sensor enrolls with the Console using its existing mTLS certificate. The Console detects the new version from the software_version field in the heartbeat and updates Sensors automatically.
List upgrade plans
In the Console, navigate to Sensors > Upgrade Plans. The page lists all plans with their status, progress counts (upgraded_sensors, failed_sensors), and the fleet breakdown.
Plan rollouts for telecom nodes
For telecom fleets, separate upgrade rings by network function role. A universal canary covering mixed node roles is rarely representative because workload patterns, protocol surfaces, and kernel configurations differ significantly across AMF, SMF, UPF, O-DU, and O-CU nodes.
Recommended ring order:
- One representative node per NF role in a non-production cluster
- Production canary: one node per NF role from the lowest-traffic site
- Site-wide rollout one site at a time
- Fleet-wide, region by region
Use sensor groups to define each ring and target upgrade plans at specific groups.
::: note On PREEMPT_RT kernels (O-DU, vDU nodes), verify that the new sensor version handles the RT kernel correctly after upgrade. Check the sensor logs for any messages about disabled kprobes, which are expected on RT kernels but should not be more numerous than before the upgrade. :::
Troubleshooting
Plan creation fails: binary_not_staged
No binary has been uploaded for one or both supported architectures. Upload the required binaries via Settings > Sensor Binaries before creating the plan.
Plan stays pending indefinitely
Sensors in scope are not sending heartbeats, or all sensors in scope are already running the target version. Check sensor health in Sensors and confirm that target_version in the plan matches the version string of the staged binary exactly.
Plan auto-pauses after first wave
At least one sensor that received the upgrade went offline within the health check window. Check journalctl -u telovix-sensor on the offline node to identify the cause, resolve the issue, and then resume the plan from Sensors > Upgrade Plans > [plan] > Resume.
Sensor shows update failed in fleet
The sensor downloaded the binary but the SHA-256 digest did not match, or the download itself failed. Re-upload the binary via Settings > Sensor Binaries to ensure the staged file is not corrupted, and verify that the sensor host has unblocked outbound connectivity to the Console on port 15483 (Telovix self-hosted default).
Kubernetes sensors show helm_upgrade_required but pods do not update
The Console is signaling that a new image is available, but the Helm release has not been updated. Run helm upgrade telovix-sensor telovix/telovix-sensor --namespace telovix-system --reuse-values --set image.tag=<target-version> to apply the new image tag and trigger the DaemonSet rollout.
Sensor reverts to previous version on restart
The upgrade wrote the new binary to a temporary path or the wrong location, and the service restarted from the original /usr/local/bin/telovix-sensor. Verify that the new binary was written to /usr/local/bin/telovix-sensor and that the file has mode 755.